Wednesday, July 27, 2011

How to Auto Arrange the Documents in the sorting order

Datacap Takes the images as input sequentially.

If we want to  arrange the documents in a Specified Order after Execution,

We have to Create a new Action library Named as "RearrangeDocuments.rrx"

1.Open Notepad and paste the fallowing code in to it .

---------------------------------------------------------------------------------------------------------------------------

<?xml version='1.0' ?>
<rrx namespace="ReaarangeDoccuments" v="8.0.0"><i ref="rrunner.rrx"/><g>
<![CDATA[
'*********************************
'Rotation Actions
'rotation.rrx
'IBM Corporation (c)2011
' Version
'  8.0.0 - 06/01/2011   Tom Stuart
'        - Original Scripting Class RRX File
'
'*********************************
]]></g>

<f name="RearrangeDoc" access="public" qi="Sample starter RRX Library">
<p name="OrderString"/>
<ap>
Document your parameters here<br/>
</ap>
<h>
Explain the usage of your action here<br/>
<e>
Place an example action call<br/>
</e>
</h>
<lvl>
Place the level (Batch,Document,Page, or Field) that you need the action to be run from if there
is any dependency.
</lvl>
<ret>
List your return conditions. <br/>
<b>TRUE or FALSE</b> If you want to affect the rules order execution for some reason, or if this is a validation
action, you may want to conditionally return <b>FALSE.</b>  Otherwise, <b>TRUE.</b>
</ret>
<see>
Reference other related actions here <br/>
<scr>RelatedFunctionName</scr>
</see>
<g>
<![CDATA[
'Your VBScript code goes here.

Dim FieldAr
Dim FieldIndex
FieldAr = Split(OrderString,",")

For i = uBound(FieldAr) to 0 step - 1
Writelog("Moving: " & FieldAr(i))
FieldIndex = 0

While CurrentObj.GetChild(FieldIndex).Type <> FieldAr(i)
FieldIndex = FieldIndex + 1

if FieldIndex = CurrentObj.NumOfChildren then
Writelog("Could not find child: " & FieldAr(i) & " Exiting.")
Exit Function
end if
Wend

Call CurrentObj.MoveChild(FieldIndex ,0)
next 'i
]]>
</g>
</f>
</rrx>

----------------------------------------------------------------------------------------------------------------------------

2.save the Notepad  Content As the "RearrangeDocuments.rrx" and place this Action

into the "C:\Datacap\***\dco_******\rules\"

i.e Rules folder of your application.

3. Refresh Your Datacap Studio.Now u can find a new action in Your Action Library.

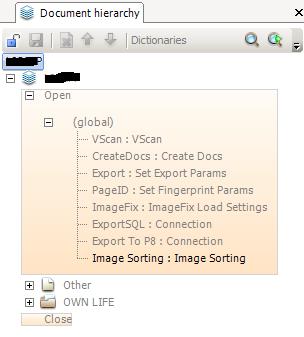
4.Create a new Ruleset named ImageSorting and the actions as mentioned below.


5.Apply this rule set at the DocumentLevel as shown bellow.


6.Place this Ruleset in the PageID of Task Profile After the PageID Rule as shown bellow.

How to Give Email Attachments as a Input To Datacap

Note: This will work only on Datacap Studio 8.0.1 Version


Datacap allows us to give input images from the Emails,fax,Scanner and

from specific document.

Now we can see how to give the email attachments as a direct input to the Datacap.

#.The action "   im_login (string hostname , string username , string password)  "

is used to login into the email account

The fallowing picture Descibes which actions to use for This.


How to Export the Multiple TIF images as a Merged TIF to the Filenet

If we have to export the multiple TIF images as a single TIF image with the Field

values to the filenet P8 ...we have to fallow the fallowing steps.

1.First we have to create a ruleset  named as "TIFMERGE" to Merge the images which

we need to export

2. Use the actions TifMerge_SetFileName(),TifMerge_SetFilePath(),TifMerge_MergeImages()

from TifMerge Namespace.

3.Store the Merged image into a specified folder.

4.In Export to P8 ruleset we have to specify the path of the merged image in the

FNP8_UploadDir("") actoin.

Note: Dont use the FNP8_Upload() in the Export to P8 Ruleset.

5. Apply the  TIFMERGE ruleset as the first one in the Export Task Profile.

The fallowing image gives the idea about ow and where to apply the actions.


Saturday, July 2, 2011

How to Add an Actions Library to Datacap Studio

Datacap Taskmaster Installation automatically supplies a full set of up-to-date

Actions Libraries (.rrx). Alert! Although you can add new libraries, and new

actions to a library – be sure to consult Datacap Support or your Installation

Manager first. (This section only explains the basic principles involved.)
Each RRX file contains related actions in a unique category.

In the case of a new Actions Library file, for example, take these steps to add it

to Datacap Studio:
• Give the file a name that reflects the nature of the actions it contains.
• Copy the file.
• Paste it into the RRX sub-folder of the Datacap directory’s RRS folder.
• Open your Datacap Studio.
Be sure the new file is part of the Actions library tab’s list of files with global actions.
This very short example from the Validations.rrx file is the code for the single

IsThisFieldFilled action.
<af name="IsThisFieldFilled" access="public" bInter="bInter" bDebug="bDebug"

qi="Confirms if current field has a captured value.">

<h><![CDATA[ Confirms if the current field has a captured value. ]]>
<e><![CDATA[ IsThisFieldFilled() ]]></e>
</h><![CDATA[
If(CurrentObj.ObjectType = DCO_FIELD) Then
If(Trim(CurrentObj.Text)<>"") Then
IsThisFieldFilled = true
Else
IsThisFieldFilled = false
end if
Else
writelog("function IsThisFieldFilled works only on field level")
IsThisFieldFilled = False
End if ]]></af>

If you do add an action, Datacap Studio will list it as part of the Actions Library.

Remember! Be sure to work with Datacap Support or your Implementation Manager

if you intend to add a new action to an Actions Library.
The Properties dialog does not display properties for a library or an action until

the action is part of a rule

Wednesday, June 15, 2011

Integrating Datacap with P8 Content Manager

1  First, we have to update P8 with a new document class

for the 1040ez.

Click Start -> All Programs -> IBM Filenet P8 Platform ->

Filenet Enterprise Manager Administration Tool.
2  Click Connect to logon to P8.

3   Expand the ECM object store so that you can find the

Document Classes.


Right click on Document Class and select New Class

4    The Create New Document

5     Enter a name of Tax Form for the new document class.

6    Locate and select the SSN property from the Property list.
7   Return to Datacap Studio so we can add some additional rules to the
configuration.
Go to the Rulesets pane.
Select the Flex configuration.
Click on the Add Child Object icon.

8    Change the ruleset name to Export to P8.
Change the rule name to Export to P8 – Batch Level

9    Right click on the Export to P8 ruleset and select Add Rule.

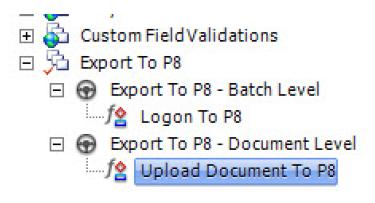
10  Change the new rule name to Export to P8 – Document Level

11  For the Batch level rule, change the function name to Logon to P8.
For the Document level rule, change the function name to Upload

Document to P8.


As you can see, we are going to have one rule, which will be bound

at the batch level, which will create out connection to P8.

We’ll have a second rule, which will be bound at the document level,

which will upload and index the document in P8.

12    Click on the Actions Library tab.
Locate and expand the Filenet P8 functions.

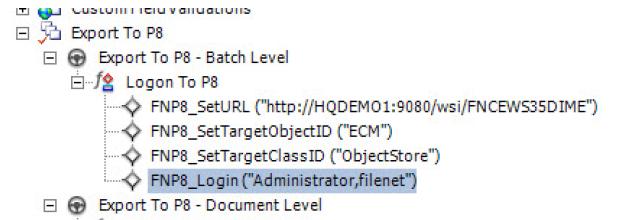
13    Now we’ll update the Logon to P8 action.
Click on the Logon to P8 function.
Click on the FNP8_SetURL action.
Click on the Add to function button.

14    Repeat the previous step for the following actions:
•  FNP8_SetTargetObjectID
•  FNP8_SetClassID
• FNP8_Login


15    Update the parameters for each of the actions as shown by the screen

capture   below.


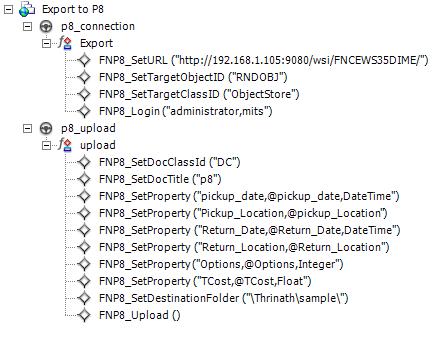
16     Update the Upload Document to P8 action by adding the following rules:
• FNP8_SetDocClassID
• FNP8_SetDocTitle
• FNP8_SetProperty
• FNP8_Upload

17     Update the parameters for each of the actions as shown by the screen

capture below.


Example:


18    Click on the diskette icon to Save the new ruleset.
Click on the lock icon to Publish ruleset.

19    Select the Export to P8 – Batch Level rule from the Rulesets pane.
Select the global part of the batch object.
Click on the Add to DCO button.

20  Select the Export to P8 – Document Level rule from the Rulesets pane.
Select the global part of the hierarchy.
Click the Add to DCO button

21  Click the diskette icon to Save the changes.
Click the lock icon to Unlock the hierarchy.

22  Select the Export to P8 ruleset.
Select the Export task.
Click on the Add ruleset to profle button.

Monday, June 6, 2011

PAGE IDENTIFICATION METHODS

PAGE IDENTIFICATION METHODS

Taskmaster supports several methods for page identification,including but not limited to:

  • Fingerprint matching

  •  Structure-based identification

  •  Text matching

  •  Manual page identification


Additionally, if your application supports only a single page type, you can simply

assign a static page type to all incoming pages. This section provides an overview

of these page identification methods.

FINGERPRINT MATCHING
With fingerprint matching, Taskmaster generates a “fingerprint” that describes

each incoming page. The fingerprint can include information about the relative

densities of different regions of the page or the location of text on the page.

Taskmaster then compares the new fingerprint to a library of fingerprints for

known page types. When it finds a match it assigns the corresponding page type.


In the example above, the incoming page matches the TopSuite room receipt.

Taskmaster assigns it the type “Room_Receipt” and records the ID of the

matching fingerprint in the runtime batch hierarchy. The match will not be

exact since the data on the page will most likely be different, but we‟re looking

for the best match.

SELECTING THE FINGERPRINT CREATION MODE
Taskmaster provides two primary methods for generating page fingerprints:

 Image analysis: This scans the page image to identify the composite

“blackness” of different regions of the page. This method provides fast

page identification, but requires that you perform recognition later.

Full page recognition: This performs optical character recognition to

identify the locations of text within the page. This method takes longer,

especially with pages that include handwritten text, but cuts time from

subsequent workflow tasks since the full page recognition results are

available for use.

Both of these methods write the resulting information to a“.cco” file

that‟s stored with the original .tif image file in the application‟s“fingerprint” folder.

USING IMAGE ANALYSIS
Image analysis uses a pixel-based algorithm to generate a fingerprint (.cco) file

that represents the relative blackness of different regions of the page.

The AnalyzeImage action in the “Recog_Shared” actions library performs image

analysis on an image file.

USING FULL PAGE RECOGNITION
Full page recognition, as its name suggests, uses the text and location of text on

the page to generate the fingerprint (.cco) file. Taskmaster includes three optical

character recognition (OCR) engines, plus one intelligent character recognition

(ICR) engine that you can use to perform full page recognition:

  •  OCR_a: ABBYY FineReader OCR engine

  •  OCR_s: Nuance (formerly ScanSoft) OmniPage OCR engine

  •  OCR_sr: Newer implementation of the Nuance OmniPage OCR engine

  •  ICR_c: Open Text RecoStar ICR engine


Additional ICR engines are also available as options. As a general rule, the OCR

engines work well with machine printed text, whereas the ICR engine works

well with hand printed as well as machine printed text.Taskmaster include

actions libraries for each recognition engine (ocr_a, OCR_s, ocr_sr, and icr_c).

Each   library includes its own version of the full page recognition action.

STRUCTURE-BASED PAGE IDENTIFICATION

Structure-based identification uses the position of a page within the batch

to determine its type. If your application handles only one page type, or if

the document structure is consistent (for example, all documents are two

pages with a main page and a trailing page), you can assign page types based

on position. You can do this using the SetPageType action.If a batch contains

documents of varying length, you can use separator pages between

documents.For an example that uses barcoded separators, look at the

Taskmaster Accounts Payable (APT) foundation application included with

Taskmaster.When you identify a page using structure-based identification,

the page is not matched to a fingerprint, and so there are no recognition

zones for your application to locate data during recognition. You can

design your application to locate data fields using keyword identification

or pattern matching techniques that do not relyon recognition zones.

We‟ll do this in a later chapter in this guide.

TEXT MATCHING
To perform page identification using text matching, you must first perform

full page recognition. You can then search the recognition results for a

string that‟s unique to each page type.In the example below, the first function

performs full page recognition and looks for the string “Car” on the current

page.If it finds it, it assigns the page type “Rental_Agreement”; if it doesn‟t the

function fails and the second function looks for the string “Flight.” If it finds it,

it assigns the page type “Air_Ticket”; if it doesn‟t the function fails and the

third function looks for the string “Room.” If it finds it, it assigns the page type

“Room_Receipt”; if it doesn‟t the page remains with the page type “Other.”


As with the structure-based techniques, when you identify a page using text

matching, the page is not matched to a fingerprint, so you‟ll have to use a

recognition technique that does not rely on recognition zones. We‟ll cover

this later in the chapter on text matching.

MANUAL PAGE IDENTIFICATION
The page identification techniques described so far all identify pages

automatically. It‟s also possible to configure your application to display

unrecognized pages to an operator for manual identification. You can do

this at scan time or during verification; however these techniques are

beyond the scope of this guide.

Saturday, June 4, 2011

THE TASKMASTER WORKFLOW

WORKFLOWS, JOBS, AND TASK PROFILES
                        A Taskmaster application has one or more workflows, where each workflow is assigned a job name and
defines a way to process documents. For example, the framework generated by the Application Wizard includes three workflows:

  •  Main Job: This is the standard workflow for processing documents from Taskmaster Client (the “thick” client). It takes a batch of documents through each of the processing steps identified earlier (input
    documents, identify pages, etc.) and is the workflow


  •  Fixup Job: This workflow is used only when there are document integrity problems and displays the batch to an operator for corrective action


  •  Web Job: This workflow is like the Main Job workflow except that it defines the workflow for theTaskmaster Web client. It supports remote scanning and lets users upload new batches to the server.
    A workflow consists of one or more task profiles. To process a batch of documents, you must run the batch
    through each task profile in the selected workflow. Some task profiles (for example, Export) run without
    operator intervention, whereas others (for example, Verify) may require an operator.


  • The profiles in the workflow are determined by the job type you select. You can see the task profiles associated with each job type by looking in the Workflow pane on the Datacap Studio Test tab. The workflow
    for “Main Job” includes five task profiles: VScan, PageID, Rulerunner, Verify, and Export. Descriptions of each task profile are provided below.


VScan  “virtual scanning” profile that gets pages into your application by copying images files from a specified location.
PageID   Identifies the incoming pages by comparing them to known pagetypes using fingerprint matching. Depending on the identification method used, this profile may perform full page OCR. It may also perform image cleanup.


Rulerunner
   Organizes pages into documents, locates the fields defined for that page type, and performs OCR to recognize the field data (or obtains the data from the full page OCR results). Also runs validation rules to ensure the data is valid.
Verify   Runs during the verification stage, when pages are displayed to an operator to ensure recognition was accurate and to handle any validation errors.

Export   Exports the structured document data to an output file, a document management system, adatabase, or an external business process (can also include the original image).

Fingerprint   Add Generates the fingerprint files when you add new page types to the application from the Datacap Studio Zones tab.
ImageFix   Runs when you enhance a fingerprint image using the Image Processing window from the Zones tab.

GENERATING STRUCTURED CONTENT FROM UNSTRUCTURED DOCUMENTS


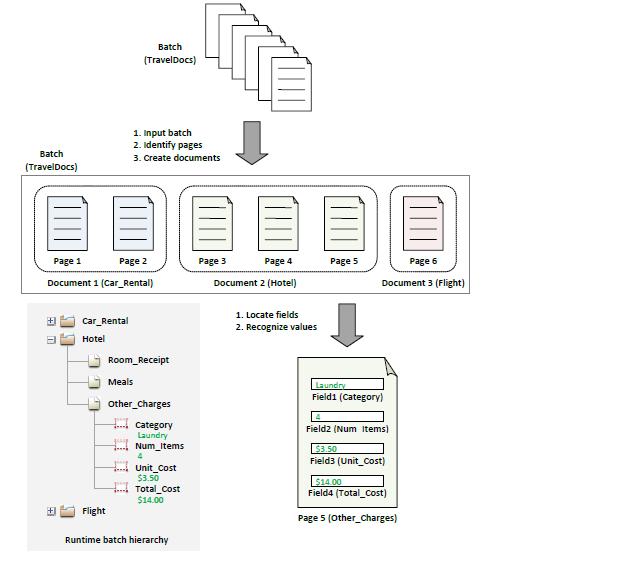
  • In a typical Taskmaster application, documents start as a batch of unidentified image files – one image per page. A single batch may contain a mix of document types, and each document may contain a different number of pages of different types. There is nothing within the page image that identifies the page type or any of the data on the page. In other words, the page images do not contain any structured content.


  • Before Taskmaster can begin to extract data it must identify the individual page types. There are several ways to do this, but the most common technique is called fingerprint matching (described later in this section).Taskmaster then maps pages to documents and fields to pages, using the information in the document hierarchy. After identifying the fields and their locations within each page, Taskmaster can then extract the data and store it in a structured format, known as the runtime batch hierarchy.


THE DOCUMENT HIERARCHY

DOCUMENT STRUCTURE


                      The document hierarchy describes the structure of the documents your application is designed to handle. The levels within the hierarchy are batch, document, page, and field.At the top of the document hierarchy is the batch, which refers to all pages of all document types. Beneaththe batch level, the document hierarchy defines:


  •  The document types your application can process. You may have only one type, or you may have multiple types.


Example: The TravelDocs application processes car rental documents, hotel expense documents, and flight documents.


  •  The page types within each document type. Each document may have only one page type, or it may havemultiple types.


Example: The car rental document includes the rental agreement page and the optional insurance page, while the flight document has only an air ticket page.


  •  The number and order of pages within each document type. Pages can be required or optional.


Example: A car rental document has at most two pages. The rental agreement page is required and must come first; the insurance coverage page is optional.


  •  The data fields within each page type. Data fields too can be required or optional.


Example: The hotel document‟s “Other Charges” page has fields for expense category, number of items, unit cost, and total cost.