Wednesday, July 27, 2011

How to Auto Arrange the Documents in the sorting order

Datacap Takes the images as input sequentially.

If we want to  arrange the documents in a Specified Order after Execution,

We have to Create a new Action library Named as "RearrangeDocuments.rrx"

1.Open Notepad and paste the fallowing code in to it .

---------------------------------------------------------------------------------------------------------------------------

<?xml version='1.0' ?>
<rrx namespace="ReaarangeDoccuments" v="8.0.0"><i ref="rrunner.rrx"/><g>
<![CDATA[
'*********************************
'Rotation Actions
'rotation.rrx
'IBM Corporation (c)2011
' Version
'  8.0.0 - 06/01/2011   Tom Stuart
'        - Original Scripting Class RRX File
'
'*********************************
]]></g>

<f name="RearrangeDoc" access="public" qi="Sample starter RRX Library">
<p name="OrderString"/>
<ap>
Document your parameters here<br/>
</ap>
<h>
Explain the usage of your action here<br/>
<e>
Place an example action call<br/>
</e>
</h>
<lvl>
Place the level (Batch,Document,Page, or Field) that you need the action to be run from if there
is any dependency.
</lvl>
<ret>
List your return conditions. <br/>
<b>TRUE or FALSE</b> If you want to affect the rules order execution for some reason, or if this is a validation
action, you may want to conditionally return <b>FALSE.</b>  Otherwise, <b>TRUE.</b>
</ret>
<see>
Reference other related actions here <br/>
<scr>RelatedFunctionName</scr>
</see>
<g>
<![CDATA[
'Your VBScript code goes here.

Dim FieldAr
Dim FieldIndex
FieldAr = Split(OrderString,",")

For i = uBound(FieldAr) to 0 step - 1
Writelog("Moving: " & FieldAr(i))
FieldIndex = 0

While CurrentObj.GetChild(FieldIndex).Type <> FieldAr(i)
FieldIndex = FieldIndex + 1

if FieldIndex = CurrentObj.NumOfChildren then
Writelog("Could not find child: " & FieldAr(i) & " Exiting.")
Exit Function
end if
Wend

Call CurrentObj.MoveChild(FieldIndex ,0)
next 'i
]]>
</g>
</f>
</rrx>

----------------------------------------------------------------------------------------------------------------------------

2.save the Notepad  Content As the "RearrangeDocuments.rrx" and place this Action

into the "C:\Datacap\***\dco_******\rules\"

i.e Rules folder of your application.

3. Refresh Your Datacap Studio.Now u can find a new action in Your Action Library.

4.Create a new Ruleset named ImageSorting and the actions as mentioned below.


5.Apply this rule set at the DocumentLevel as shown bellow.
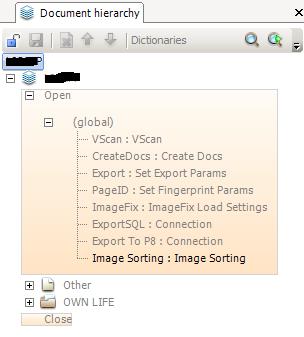


6.Place this Ruleset in the PageID of Task Profile After the PageID Rule as shown bellow.

How to Give Email Attachments as a Input To Datacap

Note: This will work only on Datacap Studio 8.0.1 Version


Datacap allows us to give input images from the Emails,fax,Scanner and

from specific document.

Now we can see how to give the email attachments as a direct input to the Datacap.

#.The action "   im_login (string hostname , string username , string password)  "

is used to login into the email account

The fallowing picture Descibes which actions to use for This.


How to Export the Multiple TIF images as a Merged TIF to the Filenet

If we have to export the multiple TIF images as a single TIF image with the Field

values to the filenet P8 ...we have to fallow the fallowing steps.

1.First we have to create a ruleset  named as "TIFMERGE" to Merge the images which

we need to export

2. Use the actions TifMerge_SetFileName(),TifMerge_SetFilePath(),TifMerge_MergeImages()

from TifMerge Namespace.

3.Store the Merged image into a specified folder.

4.In Export to P8 ruleset we have to specify the path of the merged image in the

FNP8_UploadDir("") actoin.

Note: Dont use the FNP8_Upload() in the Export to P8 Ruleset.

5. Apply the  TIFMERGE ruleset as the first one in the Export Task Profile.

The fallowing image gives the idea about ow and where to apply the actions.


Saturday, July 2, 2011

How to Add an Actions Library to Datacap Studio

Datacap Taskmaster Installation automatically supplies a full set of up-to-date

Actions Libraries (.rrx). Alert! Although you can add new libraries, and new

actions to a library – be sure to consult Datacap Support or your Installation

Manager first. (This section only explains the basic principles involved.)
Each RRX file contains related actions in a unique category.

In the case of a new Actions Library file, for example, take these steps to add it

to Datacap Studio:
• Give the file a name that reflects the nature of the actions it contains.
• Copy the file.
• Paste it into the RRX sub-folder of the Datacap directory’s RRS folder.
• Open your Datacap Studio.
Be sure the new file is part of the Actions library tab’s list of files with global actions.
This very short example from the Validations.rrx file is the code for the single

IsThisFieldFilled action.
<af name="IsThisFieldFilled" access="public" bInter="bInter" bDebug="bDebug"

qi="Confirms if current field has a captured value.">

<h><![CDATA[ Confirms if the current field has a captured value. ]]>
<e><![CDATA[ IsThisFieldFilled() ]]></e>
</h><![CDATA[
If(CurrentObj.ObjectType = DCO_FIELD) Then
If(Trim(CurrentObj.Text)<>"") Then
IsThisFieldFilled = true
Else
IsThisFieldFilled = false
end if
Else
writelog("function IsThisFieldFilled works only on field level")
IsThisFieldFilled = False
End if ]]></af>

If you do add an action, Datacap Studio will list it as part of the Actions Library.

Remember! Be sure to work with Datacap Support or your Implementation Manager

if you intend to add a new action to an Actions Library.
The Properties dialog does not display properties for a library or an action until

the action is part of a rule